Thu, Sep 13, 2018
Article may contain affiliate links. As an Amazon Associate I earn from qualifying purchases.
Follow this step-by-step guide to learn how to design your own house. No need to learn complex 3D software or hire an expensive architect. There’s a better way…
 Have a burning desire to design your own house? I completely understand!
Over the last few years I’ve connected with thousands of homeowners online - just like you - that want to design and build their own home.
Whether they want to buy house plans online, learn how to hire a contractor, remodel their current home or add a few coats of paint - they all struggle with the same questions. I’m here to tell you that it doesn’t have to be this way.
The good news is that designing your own home is actually very easy. In fact, thousands of homeowners just like you have already gone through the process finding the perfect house plans and building their dream home.
Unfortunately, it is almost impossible for homeowners to get high-quality home design advice online.
That’s why I decided to put together my best home design tips to help you through the process.
Can You Design Your Own Home Without an Architect?
I don’t want to burst your bubble, but if you’re taking home design advice from a wikiHow article online you might be in for a rude awakening when it comes time to start building.
Not to mention, there are hundreds of articles on the subject written by unqualified freelance writers - not architects.
So, instead of going through this process on your own you might ask for some help from your local architect. However, unless you’re willing to fork over a few thousand dollars to have them design your own home it’s unlikely they will give you any advice.
How can you know who to trust?
To make the process as simple as possible I’ve put together my best tips on how to design your own house into a road map below.
Why Building Your Own Home is Easier Than it Sounds

Designing your dream home can be both fun and rewarding. However, the entire home design process is much more enjoyable when you know what to expect.
One of the reasons I was compelled to put together a complete guide on how to design your own house, was so you don’t run into expensive problems along the way.
While you don’t need to hire an architect to design your dream home, it is important to understand how an architect thinks and works. There are 7 distinct phases in the home design process that you’ll go through.
As an ambitious designer, you may not care about the industry jargon, but when you work with other construction professionals you’re likely to encounter a few of these terms.
The 7 phases of home building are:
- Programming
- Schematic Design
- Design Development
- Construction Documents
- Bidding
- Construction
- Occupancy
Phase 1: Programming

In the first phase of the home design process, we’ll need to identify your needs, find place to build your home and outline a budget. I realize that these steps are not as fun as jumping into your favorite home design software and running wild.
In my opinion, these first few steps are the most important parts of the home design process.
Each of these steps helps build the foundation for what will come later in the process. For example, if you set out to design your dream home even before you find a piece of property to build it on you will be just wasting your time.
Continue reading below to see how to get started on the right foot and download my checklist to follow along.
Steps in the Programming Phase:
- Identify Your Needs
- Select Your Site
- Identify Potential Obstacles
- Outline Your Budget
- Create a Room Diagram
Step 1: Identify Your Needs
First, we will start with the essentials. What do you absolutely NEED in your new home? These are the things you can’t live without.
For example, at least 3 bedrooms, 3 bathrooms and a kitchen with an island.
Next, you will need to identify the things you WANT, but are not critical. A few common wants include a breakfast nook, radiant heating, master bath suite, his and her closets, etc.
Feel free to go wild with your wants list, after all this will be your dream home.
Step 2: Select Your Site
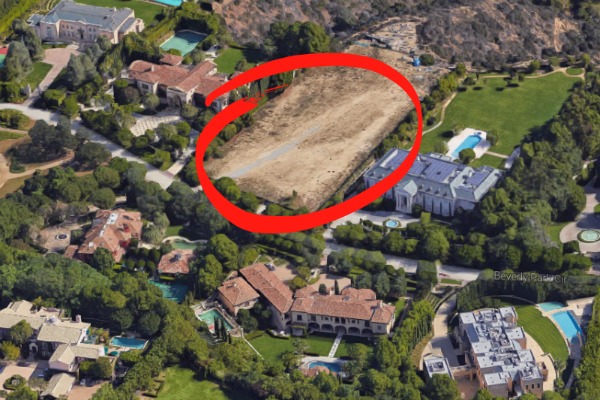
If you haven’t already, you need to find somewhere to build your dream home. This may be on your current lot, waterfront property or on the top of a mountain.
It doesn’t matter where, as long as you have an available piece of property that is zoned for residential construction.
Although it can be fun to design your dream home on an imaginary lot, most of the problems in the home design process arise from issues with your property.
Which brings us to the next step: identify potential obstacles.
Step 3: Identify Potential Obstacles
 Fallingwater (Kaufmann Residence) by Frank Lloyd Wright
In order to make the design and construction process as smooth as possible, we’ll need to identify any potential obstacles. These are usually spotted by having a site survey and soil studies completed.
A thorough site investigation will give you clues as to any problems that are under the surface, like water tables, bedrock, and hidden surprises.
You may want to take into account other natural features on your site, too. These include trees, streams, views, potential wind direction and road noises.
Take your time to identify the best area to build your home and you will have no regrets later down the road.
Editor’s Note: The photo above of Fallingwater (Kaufmann Residence) by Frank Lloyd Wright’s shows how obstacles on your property will influence the final design. For example, this house was designed to extend over a stream that ran directly through the property. How will the natural features on your lot impact your design ideas?
Step 4: Outline Your Budget
So, we’ve had fun up to this point creating a list of your wants and needs. We’ve identified a few things that you can’t live without and a long list of features you’d love to had. Now we need to set our priorities and decide what we need to take off the list.
See also: How Much Does it Cost to Build a House?
We will first create a rough budget outline. For this we’ll need to know the size of your new house in total square feet. Next, we’ll need to do some research to determine the local home construction costs. While I can give you some estimates to start with, you’ll need to make calls to local home builders to get a more accurate estimate.
You’ll also need to know what type of materials you plan to use or any special features you want to incorporate. For example, if you want more space but don’t care about marble floors or high-end light fixtures, you’ll be able to know where to make potential sacrifices. On the other hand, if you want a gourmet kitchen and comfortable entertaining area you will need to be prepared to fight for them when obstacles come up.
One reason we chose your building site and identified potential obstacles first, was because they can devour your budget quickly if you’re not prepared. Does your site have access to water, sewer and electricity? If not, you need to add these additional expenses in your budget.
Step 5: Create a Room Diagram
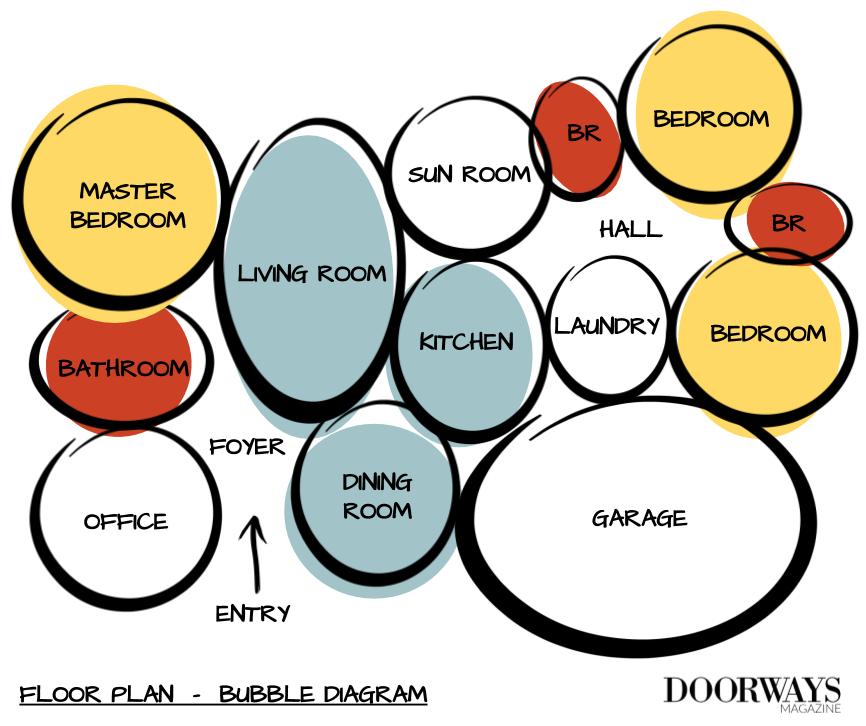
Finally, we get to start designing your dream home. So far, we’ve identified your wants and needs, completed an in-depth site investigation and outlined your budget. We’ll use all of these pieces to create a few simple room diagrams.
Believe it or not, the easiest way to design any building is with a basic bubble diagram. Even though architects have advanced technology and cutting-edge 3D programs at their fingertips, most start with pen and paper. This is where you should start, too.
Grab your pen and start drawing circles to represent each room. Will your kitchen and living room be next to each other? Where will the dining room go? How will you get from the front door to the kitchen. Start imagining the sequence and draw circles to illustrate your ideas.
Also keep in mind any potential views on your property, the angle of the sun throughout the day and access to your backyard.
What Should Be Included in My House Plans?
Designing your dream home sounds easy at the beginning - just draw the rooms (preferably big rooms) on a sheet of paper then call it a day. The good news is that I am here to guide you through the process step-by-step so you don’t miss a single piece of the equation. The bad news is that building a house takes many different types of drawings besides just floor plans.
The Basics:
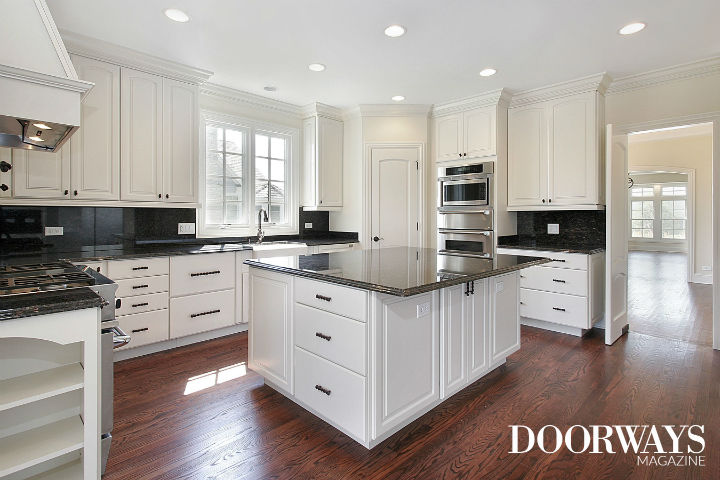
When you start designing your house, you’ll likely start with the basics. These include your bedrooms, bathrooms, kitchen, dining and living room. Layout the rooms is a simple diagram. What rooms will be next to each other and how will you move from one room to the next? Will this be a one, two or three story house and which rooms will be one which floor?
- Kitchen
- Dining Room
- Living Room
- Family Room
- Bedrooms
- Bathrooms
Additional Spaces:
The next step will be to fill in the other spaces you want or need. Some of these will be required, but others will be optional. For example, you’ll need a laundry room, closets and a foyer. You may want a deck or patio to enjoy those warm summer days. On the other hand you could add a sunroom to have your coffee in the morning.
Now that you have the basics laid out, it’s time to go wild. After all, it’s your dream home.
- Mastersuite
- Walk-in Closets
- Bedroom Closets
- Coat Closets
- Laundry Room
- Foyer
- Garage
- Deck or Patio
- Sunroom
- Bonus Room
- Guest Bedroom
- Attic
- Basement
The Details:
As you get more detailed with your house plans, you may realize that there are many more elements needed to make it a real house. Things like doors, windows and lights are all important. If you have multiple floors, you’ll need to draw in the location of the stairs and you’ll also need to know the ceiling height of the floors.
If you are plan to buy house plans online, all of these details will be worked out for you already. However, if you are drawing your own plans, you’ll need to pay special attention to these details.
I can’t tell you how many homeowners I’ve talked to that wished they could start the home design process all over again because they didn’t think out the details beforehand.
- Entry Door
- Interior Door Locations
- Window Locations
- Lighting Locations
- Appliance Locations
- Location of Plumbing Fixtures
- Number of Floors
- Stair Location
- Ceiling Height
- Roof Pitch
- Skylights
- Clerestory windows
- Sliding glass doors
- Interior Paint Colors
- Flooring Materials
- Door Styles
- Window Styles
- Bathroom Fixtures
- Water Heater Location
- Radiant Heating
Phase 2: Schematic Design
In the second phase we will take your ideas to the next level. Once you have a few basic bubble diagrams we will need to add more detail. At this point you will start to refine your ideas and start to draw your plans with more precision.
Currently, your diagrams should have your primary spaces drawn out. These include your main living areas like the kitchen, dining room, living room, bedrooms and bathrooms. In order to take it to the next level, we’ll need to add closets, doors, windows and potential bathroom layouts.
By this point you should know the style of your dream home, if not, I’ll help you narrow down your choices and give you a few creative ideas. The style of your home (craftsman, modern, traditional, etc.) will make your design decisions much easier. For example, a modern home will have much different kitchen cabinets and details compared to a craftsman home.
Before you begin the process to design your own house or buy a set of house plans, you’ll have to make a few basic decisions. For example, where will you build your dream home and what style will it be?
While frequently overlooked, these basic questions will drive the entire design conversation. Whether you plan to consult with an architect or design your own house, you will need answers to both these questions before we can go any further.
Knowing where you home will be built is an essential first step. Now you need to get specific and choose an exact piece of land - preferably one that is for sale or that you already own. Although I could help you design your imaginary dream home, having a location for this house will inform our design direction.
For instance, you will need to know about the local zoning laws, building codes and potential Homeowners Association CCRs (Covenants, Conditions and Restrictions). These codes and restrictions will tell you how big your home can be, required setbacks from the property line, utility and sewer requirements as well as many others. Unfortunately, most of these problems don’t solve themselves and can ruin many dreams in the blink of an eye.
The location will also play a major role in the style of your home.
Have you always loved Colonial style homes that were built with brick but want to build one in Southern California? Think again.
Not only will your home stick out like a sore thumb among stuck ranch style homes, but it’s unlikely you’ll be allowed to build with real brick.
Those pesky earthquakes will make designing your dream home an uphill battle.
If you still need some ideas on what style your home will be, I’d suggest looking at a few of these popular house plan styles:
- Craftsman
- Modern
- Traditional
These style decisions will also affect how your home looks on the outside as well. In the schematic design phase we will start to design the exterior of your house, too.
Steps in the Schematic Design Phase:
- Add Details
- Choose a Style
- Design the Exterior
Phase 3: Design Development
Now that we have worked out the specific details of your dream home, we’ll need to take it to the next level again. In the design development phase we will draw floorplans to scale and incorporate the structure into these plans.
The design development phase is really all about getting your home plans ready so a contractor can read them and build from them.
While many architects will argue that the structure and materials should be thought about from the beginning, not in the middle of the design phase.
This is true for an experienced designer, but it’s not a requirement for someone that wants to design their own home.
An architect will be balancing materials, spaces and structure in their head to design the perfect room. They can make this look easy only after years of practice.
You, on the other hand, will need to take it one step at a time to avoid making critical mistakes. Even experienced architects make serious mistakes and you will too if you get ahead of yourself.
On one project I built while working for a contractor, there were over 3,000 changes made to the plans after construction had already started!
Every time there’s a change to the plans, it will cost you extra money when the project is all said and done. Don’t let this happen to you.
You will also need to select materials for each room. What type of flooring will be in the kitchen, living room, bedrooms and bathrooms? Will they all be the same or different? What materials will you use for the countertops and cabinets?
All these questions need to be answered clearly and carefully.
Don’t forget to calculate potential material costs in respect to your budget.
Steps in the Design Development Phase:
- Create Floorplans
- Select Materials
- Design Interior Elevations
Phase 4: Construction Documents
With the design development phase complete you should have detailed plans about what your home will look like and the materials you plan to use. We’ll use this information to draw complete construction documents that a contractor will use to build your home from start to finish.
Having accurate construction documents is absolutely critical because they form the foundation of your contract with a contractor. Your contractor will use these drawings to bid on the cost of the project. If your house plans are not complete before construction starts you will have to pay for changes later, which is what we want to avoid at all costs.
After you have all the required pieces in place and have complete plans of your dream home, now it’s time to build. Unfortunately, home builders need very specific instructions in order to build your home correctly. These are called construction documents. They will become part of the building contract you sign with the contractor. Architects and home designers are experienced with the process of creating construction documents and may be able to answer some of your questions if you get stuck along the way.
Required Construction Document Drawings:
- Site Plan
- Floor Plans
- Ceiling Plan
- Interior Room Elevations
- Exterior Elevations
- Building Sections
- Structural Plans
- Electrical Diagram
- Plumbing Diagram
- Door Schedule
- Window Schedule
- Complete Material Specifications
Steps in the Construction Documents Phase:
- Develop Document for Construction
- Create Building Specifications
- Apply for Building Permit
Phase 5: Bidding
With complete construction documents in hand, we’ll now start looking for a contractor that can build your dream home to your specifications, while staying on schedule and under budget. This is easier said than done, but I’ll show you the easiest way to hire a contractor.
In the bidding phase you’ll need to interview at least 2 contractors but no more than 3 at a time. After you find 3 contractors that you feel comfortable and confident with you’ll need to ask them to submit a bid.
The contractors you select will be able to look at your construction plans and specifications to determine how much it will cost to build. Using this information and their past experience they can tell you how long it might take them to build it as well.
Steps in the Bidding Phase:
- Interview Home Builders
- Get Contractor Bids
- Outline Construction Schedule
Phase 6: Construction
Once you select a contractor, they will take your plans and get to work. They will begin ordering materials, coordinating subcontractors and moving their equipment on to your property.
The first steps of construction will be to get the site ready to build on. Site prep may include excavation, fill or grading before they can start to build your foundation.
Once the site is ready, they will lay plumbing, electrical and utility hookups. Next, they will pour the concrete foundation before they can start building on top of it.
Once the concrete has set, they will begin framing and closing up the exterior of the building. Usually the framing and exterior sheathing will move quickly, because the exposed materials may be compromised if left unprotected against the elements.
Related resource: Lumber dimensions explained
After windows and doors are installed, the contractor will begin working on the interior details and finishes. This process includes installing plumbing fixtures, electrical systems and drywall. They will also paint the walls, install flooring and cabinets.
Steps in the Construction Phase:
- Site Prep and Foundation
- Framing and Exterior
- Interior and Finishes
Phase 7: Occupancy
Steps in the Occupancy Phase:
- Punch List
- Final Payments
- Move In
In the final phase of the home design process you will reach “Substantial Completion.” This means the contractor has fulfilled its obligation to build what they said they would: your dream home. But, at this point your home won’t be complete. There will be a large number of things that don’t look like you would have expected.
To make sure that the contractor finishes your project exactly as the plans were drawn, you will start a “Punch List”. This is a comprehensive list of items that need to be fixed per the drawings.
After you finish this list it will become part of your contract documents. The contractor will quickly fix these items so the can receive their final payment from you and move onto the next project.
Once the punch list is complete you can finally move into your dream home! If you were beginning to doubt that this day would come, you can finally relax. It’s time to move in and enjoy the fruits of your labor.
No more long days of phone calls, emails and saw dust. Sit back and relax in your new living room, or start from the beginning again and design your next dream home!

READ NEXT